
Even though proficiency with Morse Code is no longer required for getting an Amateur Radio license, young students often find code a fun activity. Fancy Code Keys can run in the hundreds of dollars and even a cheap plastic based “bargain” key is $12 to $20 each, even on eBay, and you have over 25 students!
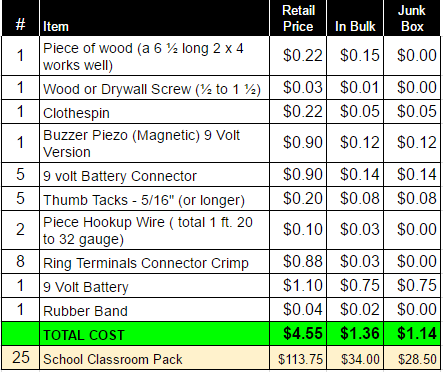
The Clothespin Key was designed with price and durability in mind. In addition, it allows the students to assemble their own keys. Here is a typical price list:
As you can see, if you buy in bulk, you or your radio club could easily cover the cost for a class of 25 students by passing the hat at your next club meeting. You will notice the battery is over ½ of the cost for the key, so if you make it BYOB (bring your own battery) the keys can be under a dollar each.

I have included a pictorial diagram of the project. If printed to scale you can actually make copies of the paper and paste them to the top of each board and students could then place parts as illustrated. 
Here are some of my thoughts on the design, please feel free to adjust to your needs and available materials.
- 9 Volt Buzzers were chosen over 3.5-volt versions due to lower cost of a single 9-volt battery and connector versus 3 AA cells and corresponding cell holder.
- Buzzer Prep- I add a small dot of red paint to mark + connection and then carefully bend the two leads. If desired, adding crimp connectors gives assembler more length to work with resulting in a more reliable connection.
- Even though we call them thumbtacks most students cannot easily push them into the wood. So I drill pilot holes in the wood to assist in both pushing and placement.
- Almost any hookup wire will work. I get free 25 Pair 24 AWG Communications Cable surplus ends (one foot of this can supply 50 keys!). Colors will not be all red but instead a fun rainbow of colors.
- Crimp end connectors are optional, but if not used I recommend stripping a longer end and wrapping wire around thumbtack before pushing in. Make sure the stripped portion extend out to the edge of the thumbtack.
- I prepare the clothespin ahead of time by:
- Drilling a “snug” hole in top and bottom of end of clip to create the spot for the two thumbtacks that make up the key “contacts”
- Twisting clothespin slightly sideways to access the inside to drill the hole for the screw. I then screw the clothespin to the board. (After the contact thumbtack on the bottom is completed twist the clothespin back into place.
- If you have a problem with the top thumbtack popping out during use there are two easy solutions
- Apply a small amount of glue from hot glue gun
- Slice a small thin piece of an eraser and push up against the bottom of the top thumb tack (be careful not to poke yourself).
Instead of thumbtacks for the battery and buzzer wire connections, you can splurge with about 20 cents each for three Fahnestock Clips or slightly more money using brass screws and cup washers.
In addition to being used as a single key and buzzer, you can add a few connectors and a length of wire between two keys and set up a point-to-point pair of “telegraph offices”
Pressing the key on either end will sound both buzzers.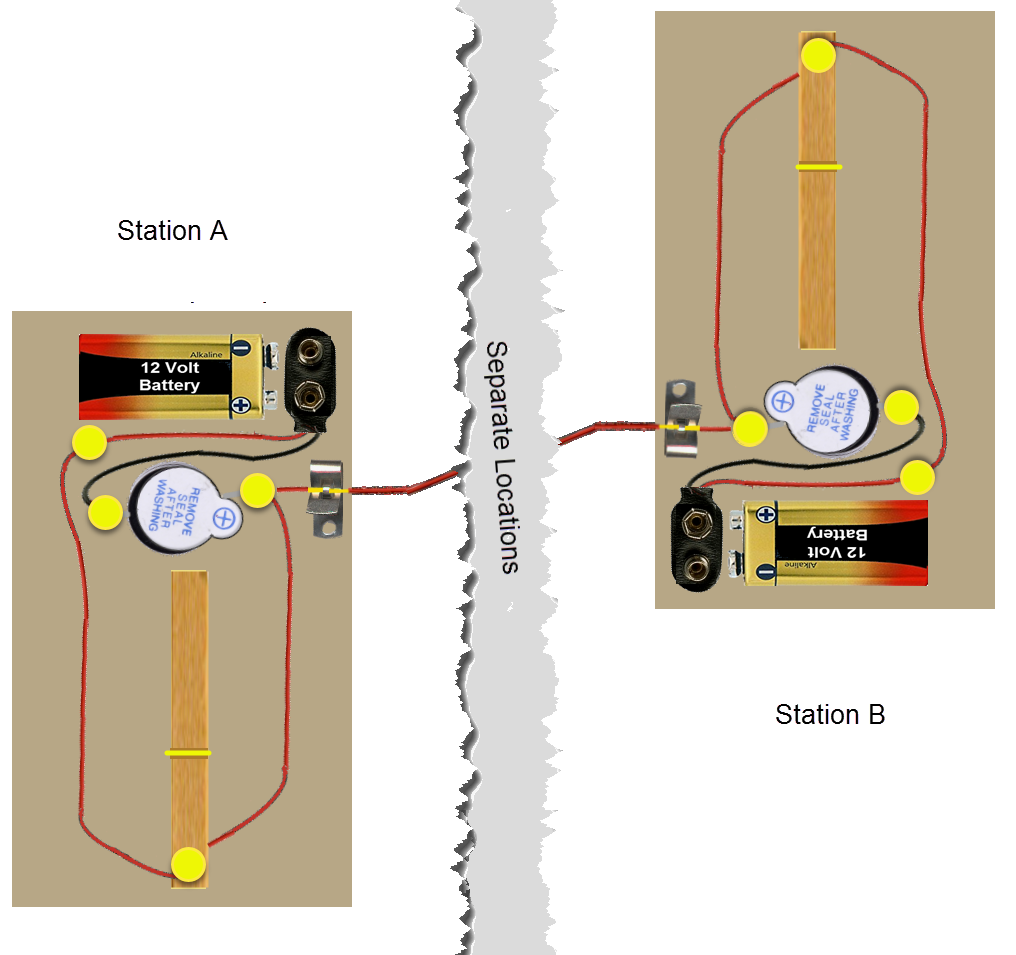
Of course, the next step could be the replacement of the connecting wire with the addition of a small, low power transceiver on each key. If unlicensed something along the lines of http://makerf.com/posts/fun_with_crystal_oscillators_part_1 or if licensed any of the <$10.00 “Pixie” or “Frog” radios found on eBay.
Here are few websites on Morse Code from my ZTLearn.com website:


Here are my web pages on Radio Technology in The Classroom & DIY (each page has over 50 links) from my ZTLearn.com website:


No comments:
Post a Comment