
Using Elecraft KX3/K3 KY Codes to Allow N1MM & RTTY-FSK
A Step-by-step Guide (assuming no previous experience)
Anthony Luscre- K8ZT
Introduction
This guide has been written assuming you have had little or no experience with using KX3 USB Interface or N1MM operations. For those with previous knowledge fill free to skip ahead to needed configuration and sample Macros. There maybe other settings that work, but these worked for me.This setup should also work with K3 or K3S
Why?
- I wanted to use the KX3’s excellent FSK (not AFSK) and KX3’s RTTY to Text Decoding
- I did not want to use a Signalink or other digi interface or use my computer’s sound card
- I was only interested in using RTTY for casual operation in a contest that required serial numbers and wanted to be able easily send reply with incrementing serial numbers
- A bonus is ability to also use this setup for SSB or CW (If you are interested in non-macro driven, direct keying CW see appendix)
What you need-
- ACC-1 USB Interface Cable that ships with KX3 (the same one you use for Firmware updates)
- Computer running Windows XP, 7, 8 or 10 (“N1MM Logger+ incorporates the latest multi-threading technology, and will take full advantage of multi-core CPUs.. A single-core 1.6 GHz processor is probably the minimum required, but the CPU requirements depend quite heavily on which program options, modes, etc. are selected, so this may not be adequate depending on how you use the program. The program itself does not require a large amount of memory, but the more memory you have, the more smoothly Windows multitasking works.”)
Setup-
- Install KX3 Utility Software
- Plug USB cable into radio & computer
- Turn on KX3
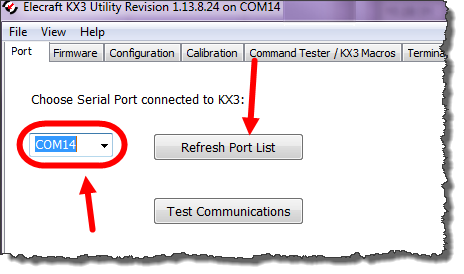
- Determine USB Port # being used by KX3
- Start KX3 Utility Software and click “Test Communications” button
- Note the resulting port # (this will vary depending on other device connected to your computer.)
- Exit (File...Exit) KX3 Utility Software
- Install N1MM Software
- Configure N1MM Software
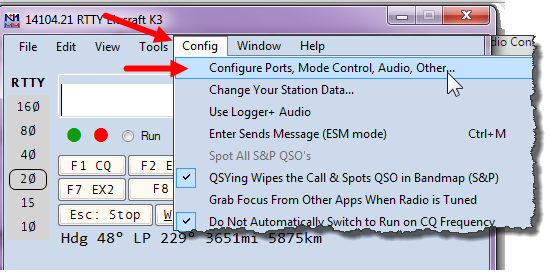
- On top menu choose “Configure” then “Configure Ports, Mode Control….”
- “Configure Ports, Mode Control….” dialog box will open
- You will need to use two tabs at the top
- “Hardware”
- “Digital Modes
- Configure Hardware Tab


- Choose the Port # that you noted above (with KX3 Utility Software). If the port is not listed, change one of the ports to the number you need
- Choose KX3 as the Radio
- Check “CW/Other” box
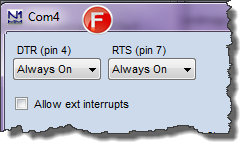
- Click “Set” to configure connection settings as show in screenshot D
- Check “Digi” box for any port number that is not being used by KX3 or other USB devices connected to your computer. (If not sure choose clicking on the drop down box will show available ports).
- Click “Set” on the port you have chosen for “Digi” and set as in the screenshot F
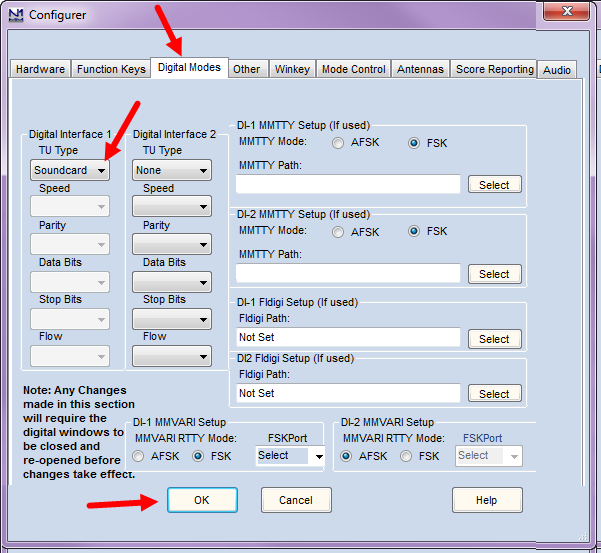
- Configure “Digital Modes” tab
- Choose “Digital Interface TU Type”. Then chose “Soundcard”.
- Click OK to close
- Close “Configure” then “Configure Ports, Mode Control….” dialog box
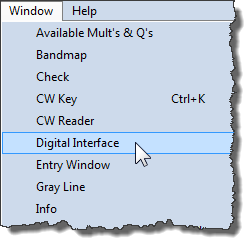
- Click on “Windows” Top Menu bar then choose “Digital Interface” a pair of windows should open.
- On the “Soundcard” dialog box, choose “Interface” menu.
- Select “MMTTY” (It should not, but if it does say you have to install “MMTTY”, it is free software- http://hamsoft.ca/pages/mmtty.php).
- You can minimize them and/or move them out of the way as they will not function in this configuration.
- You will be using the KX3 Decoded Text Display
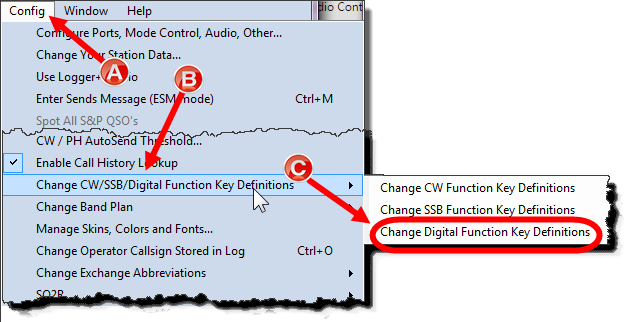
- Load N1MM Macros
- On the top menu choose “Configure” then “Configure Ports, Mode Control….”
- Click “Change CW/SSB/Digital Key Definitions”
- Click “Change Digital Function Key…”
- Paste the sample “Run” & “Search & Pounce” messages (see sample list below) into box.
- Edit to match your preferences.
- Save, with a new name (KX3-Macros-CW) or anything to distinguish it from N1MM default messages file.
- Please note: macro in F12 is designed to stop transmit if does not terminate on its own.
Sample set of Macros for RTTY Contesting
#Simple RTTY K3/KX3 EXAMPLE
#The space between the KY and the first character in the actual message
#is required by the K3/KX3 command syntax, as is the semicolon at the end
#of the message.
##REM ———-, Special instructions begin at end-of-file —————————–
#
#
#RUN____,Run DIGITAL Message begin here —————————–
#
F1 CQ,{CATA1ASC SWH21;}
F2 Ex,{CAT1ASC KY {CALL} 599 {EXCH};}
F3 TU!,{CATA1ASC KY TU CQ {MYCALL} TEST;}
F4 MYCALL,{CATA1ASC KY {MYCALL};}
F5 HIS CALL, {CATA1ASC KY {CALL}?;}
F6 RptCQ,{CATA1ASC SWH21;}{CATA2ASC SWH21;}
F7 EX2,{CAT1ASC KY 5NN {EXCH} {MYCALL};}
F8 AGN?,{CAT1ASC KY AGN?;}
F9 Nr?, {CAT1ASC KY NR?;}
F10 SEC?, {CAT1ASC KY SEC?;}
F11 Wipe,{WIPE}
F12 STOP,{CATA1ASC RX;}{CATA2ASC RX;}
#
#S&P ———-, Search and Pounce DIGITAL Messages begin here —————————–
#
F1 CQ,{CATA1ASC SWH21;}
F2 Ex,{CAT1ASC KY 599 {EXCH} {MYCALL};}
F3 TU!,{CATA1ASC KY TU {MYCALL};}
F4 MYCALL,{CATA1ASC KY {MYCALL};}
F5 HIS CALL, {CATA1ASC KY {CALL}?;}
F6 -,
F7 EX2,{CAT1ASC KY 5NN {EXCH} {MYCALL};}
F8 AGN?,{CAT1ASC KY AGN?;}
F9 Nr?, {CAT1ASC KY NR?;}
F10 SEC?, {CAT1ASC KY SEC?;}
F11 Wipe,{WIPE}
F12 STOP,{CATA1ASC RX;}{CATA2ASC RX;}
#
#REM ———-, Special instructions begin at end-of-file —————————
Sample set of Macros for CW Contesting
#RUN____,Run CW Message begin here —————————–
#
F1 CQ,{CATA1ASC SWH21;}
F2 Ex,{CAT1ASC KY {CALL} 5NN {EXCH};}
F3 TU!,{CATA1ASC KY TU CQ {MYCALL} TEST;}
F4 MYCALL,{CATA1ASC KY {MYCALL};}
F5 HIS CALL, {CATA1ASC KY {CALL}?;}
F6 RptCQ,{CATA1ASC SWH21;}{CATA2ASC SWH21;}
F7 EX2,{CAT1ASC KY 5NN {EXCH} {MYCALL};}
F8 AGN?,{CAT1ASC KY AGN?;}
F9 Nr?, {CAT1ASC KY NR?;}
F10 SEC?, {CAT1ASC KY SEC?;}
F11 Wipe,{WIPE}
F12 STOP,{CATA1ASC RX;}{CATA2ASC RX;}
#
#S&P ———-, Search and Pounce CW Messages begin here —————————–
#
F1 CQ,{CATA1ASC SWH21;}
F2 Ex,{CAT1ASC KY 5NN {EXCH} {MYCALL};}
F3 TU!,{CATA1ASC KY TU {MYCALL};}
F4 MYCALL,{CATA1ASC KY {MYCALL};}
F5 HIS CALL, {CATA1ASC KY {CALL}?;}
F6 -,
F7 EX2,{CAT1ASC KY 5NN {EXCH} {MYCALL};}
F8 AGN?,{CAT1ASC KY AGN?;}
F9 Nr?, {CAT1ASC KY NR?;}
F10 SEC?, {CAT1ASC KY SEC?;}
F11 Wipe,{WIPE}
F12 STOP,{CATA1ASC RX;}{CATA2ASC RX;}
#
#REM ———-, Special instructions begin at end-of-file —————————–
#On K3/KX3 use straight Key to end tranmission at anytime
#
Sample set of Macros for SSB Contesting
#RUN ———-, Run SSB Messages begin here —————————–
#
F1 pulls message from Memories, test to verify assignments in your radio
F1 CQ,{CATA1ASC SWT21;}{CATA2ASC SWT21;}
F2 Exch,{CATA1ASC SWT31;}{CATA2ASC SWT31;}
F3 Thanks!,{CATA1ASC SWT35;}{CATA2ASC SWT35;}
F4 {MYCALL},{CATA1ASC SWT39;}{CATA2ASC SWT39;}
F5 -,
F6 RptCQ,{CATA1ASC SWH21;}{CATA2ASC SWH21;}
F7 REC,{CATA1ASC SWT37;}{CATA2ASC SWT37;}
F8 -,
F9 -,
F10 -,
F11 -,
F12 STOP,{CATA1ASC RX;}{CATA2ASC RX;}
#
#S&P ———-, Search and Pounce SSB Messages begin here —————————–
#
F1 CQ,{CATA1ASC SWT21;}{CATA2ASC SWT21;}
F2 TU QRZ,{CATA1ASC SWT31;}{CATA2ASC SWT31;}
F3 NA1DX,{CATA1ASC SWT35;}{CATA2ASC SWT35;}
F4 {MYCALL},{CATA1ASC SWT39;}{CATA2ASC SWT39;}
F5 -,
F6 RptCQ,{CATA1ASC SWH21;}{CATA2ASC SWH21;}
F7 REC,{CATA1ASC SWT37;}{CATA2ASC SWT37;}
F8 -,
F9 -,
F10 -,
F11 -,
F12 STOP,{CATA1ASC RX;}{CATA2ASC RX;}
#
No comments:
Post a Comment